Why should you choose Rocksauce Studios? Long story short, you want it done right! When yo...

One of our most popular YouTube videos is a Figma Friday tutorial on creating hover effects in Figma. Our UX Design expert, Madeline Olsen, walks you through the steps in this blog and video.
What Are Hover Effects In Figma?
First, what is a Figma hover effect? This is the type of interactive effect that allows a visitor to your site/page/app to interact with your content. One example, the one Olsen shows you here, is clicking a heart icon to like, or engage with, online or in-app content. When the user clicks the heart, it moves from an outline of a heart to a filled in heart.
Engagement is one of the key metrics we can look at when we are deciding what type of content our users are interested in. It is also a factor in various algorithms that help our content get selected for wider distribution, to get more eyes on what we are putting out there. So you can see why this Figma Friday video is a crowd pleaser loaded with useful information!
How To Create Figma Hover Effects?
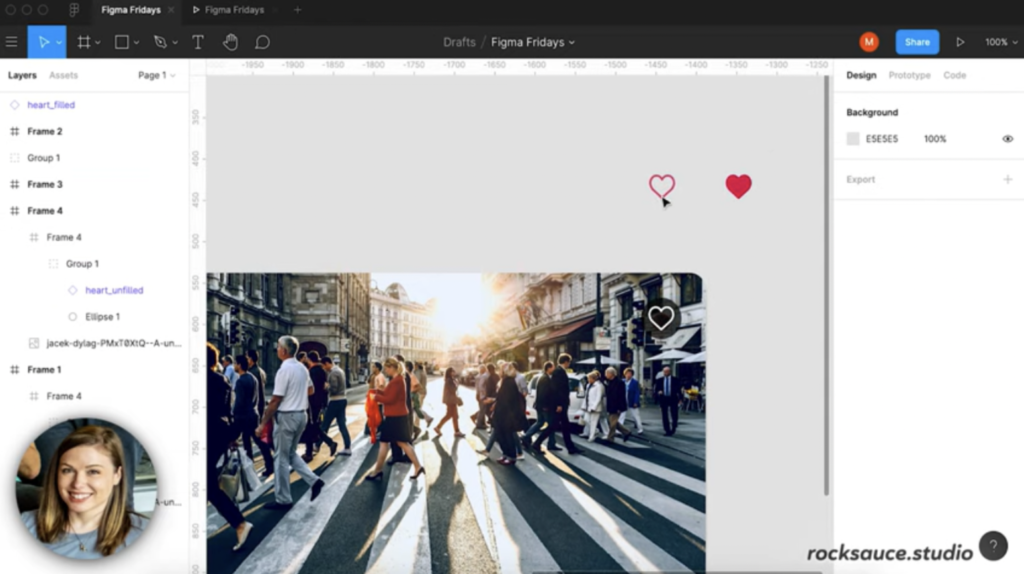
Start in the Design screen with an image in a frame, as seen below (Frame info on left, screen info to the top right). In the right hand corner of the background, you have a heart stroke and a heart fill. Next, double click on the black and white heart icon on the right hand side of the image itself. That will select the layer.
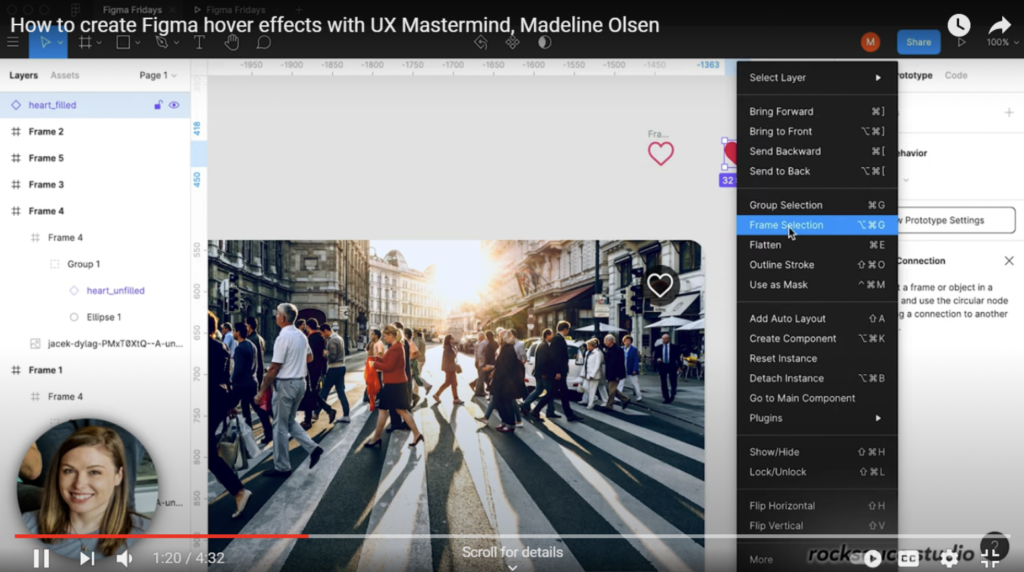
Now switch out of the Design screen into the Prototype screen. This will create a small node on the right hand side of the black and white heart icon in the image. To make a connection between the hearts for the hover effect, right click on the red heart stroke. This will pull up a drop down menu. Choose “Frame selection to designate that heart as a frame. Now do the exact same thing (right click and choose frame selection) for the red filled heart.
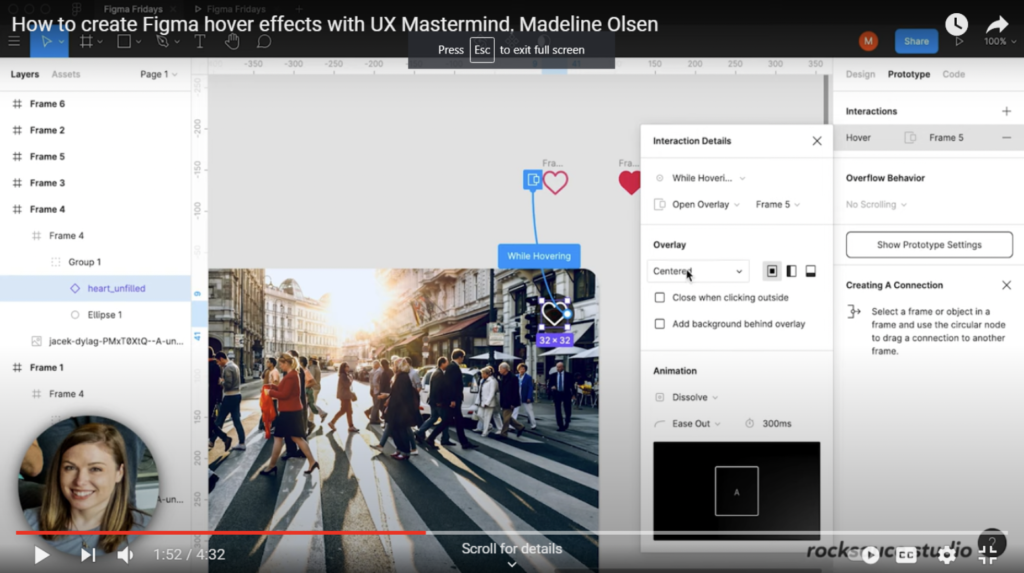
Now you can click on the node on the right of the b/w heart and drag it up to make a connection with the heart with the red stroke. When it connects, it will open up an Interaction Details window, seen below. In the first drop down menu in the Interaction Details window, select “While hovering.” In the second drop down menu, select “Open overlay.”
Make sure the frame selection (Frame 5 in our example) is the same frame as the heart with the red stroke. Proceeding down the Interaction Details window, select Manual in the drop down menu for Overlay. With Manual selected, you can move the red stroke image wherever you want, but we are leaving it layered on top of the b/w heart.
Then you can decide on your Animation style. In our example, Olsen chooses “Dissolve,” so that when she hovers over the b/w heart, the red stroke appears.
However, we still need to create the red fill effect for when someone clicks on the b/w heart. Instead of creating a second connection to the original b/w heart, we need to work with the top layer, which is the heart with the red stroke. To do so, grab the node to the right of the red stroke heart and drag it to the heart with the red fill to make that connection, opening the Interaction Details window again.
This time, in the Interaction Details window, select “On Click” and “Swap with” for the first two drop down menus. Then make sure the Frame corresponds to the red filled heart (Frame 6 in our example). Now select “Instant” for the Animation, so that when someone clicks on the heart in the image (now b/w with a red fill when you hover), it will instantly change to a red fill. Close out the Interaction Details panel and verify in your image that it works. Ta dah! Brilliant!
Okay, so you thought we were finished, didn’t you? Psych! So close, but remember it’s important to set it up so a user can unclick to unfill the heart. We mean, nobody needs to like their ex’s–or worse, their ex’s new love’s–photos, yet sometimes we do so inadvertently. That kind of thing. So to build in the unclick to unfill effect in, here’s what you do.
Go back to the red fill heart and click to open the Interactions panel. Now select “Click,” and in the next window for Interaction Details, choose “On Click,” then “Close Overlay.” Go back to your prototype to check that hover, click on, and unclick all work.
Will you love to learn more about our UX Design expert? Or you want to part of Rocksauce team?? Click here to contact us today
Voila! Happy hovering.
Watch the full video:
So you want to build an app–congratulations! We’re big fans of apps, truly! Now to addre...